Domain

Set up Google for Work
keyboard_arrow_right
Before trying to setup Google for Work, please contact us so we can assist you in enabling Google for Work for your domain. 

After we've enabled it, please follow the steps below when setting up Google for Work:


1) You will be prompted to verify through Gandi, do NOT try to verify through Gandi. Instead please click "verify your domain here" as shown here: http://screencast.com/t/arHiT8zDXx
 
2) Copy your Meta Tag verification code: http://screencast.com/t/5DnsApqiNr
 
3) Go to https://outboundenginelogos.com/mylogos and click the "Edit Site" link to edit your website. You should then paste the Meta Tag code in the Header Code of your site, save and publish: http://screencast.com/t/9xXRchwlOi
 
4) After your site has been saved and published, return to Google for Work and check off "I added the meta tag to my homepage." and verify your domain: http://screencast.com/t/65twrFcpBDCn
Purchased the wrong domain
keyboard_arrow_right

No worries, we are always here to help! We do advise you to check the spelling of your domain before completing your purchase. As we understand sometimes mistakes happen, if you have completed your registration for your Domain and additional subscriptions with us using a domain that is misspelled or incorrect you may choose to cancel the domain before the yearly registration is up. 

Before doing so we do suggest checking the corrected Domain is available for registration. If so please proceed with purchasing the corrected subscriptions.

If you need assistance in transferring or exporting your content from the old site to the new site, need to cancel the misspelled domain subscriptions or if you have further questions please reach out to customer service directly.

How do I manage the website or domain I bought?
keyboard_arrow_right
Congratulations on establishing an online presence for your business! Curious about how or where to start? Below please find some simple definitions of the terms and instructions for how to start your online journey.
 
Domain: This is your registered address on the web. Think of it as a home address such as 1234 Long Way, but it's actually a web address. Whether you have your domain with our company or someone else, you will need to pay a yearly fee to maintain registration of the address. You don’t just need a domain to have a website--you will need to “build” on your domain to complete and publish a website.

Website: The actual website pages with content and images built and published on your domain. When you visit someone’s domain, this is what you see in your browser.

Website Hosting: In order to publish a website online and to keep it live, you need Web hosting. Web Hosting is the storage of all of the pages of your website and it makes them available to computers connected to the Internet. The domain name, such as "sony.com," is actually linked to an IP address that points to a specific server or cloud storage. When somebody enters your domain name into their browser's address field, the IP address is located and website is loaded from that server or cloud storage.

Almost all host providers have a monthly or yearly fee to cover hosting your website live on the internet. This is why you have a recurring monthly payment with us to maintain your services. Your monthly fee also covers continued access to your website editing tool for any changes you would like and may include email services.
Now that we’ve defined the basic terms, we’re happy to provide further information on what to do you with your newly registered domain and how to access your domain settings.

If you have not already, you can upgrade your domain with us to a website hosting package and begin designing your website right away. We have several packages available from a DIY website package to a fully customized service provided by a web developer. To upgrade your domain to a website package with us, please follow the steps below:

 
1. Log in to your account on our website.
2. Go to the “My Projects” page via the drop down menu in the upper right hand corner on any page of our site (this should appear once you log in).


3. Locate the domain that you registered on the left hand side. There will be a white “Manage” button next to the domain you registered. Click on the “Manage” button to be taken to your domain management page. You can then click on: “Buy Website Builder” to view our website packages and upgrade your domain.


If you already have a website or if you have purchased a website builder with another company, you can also point the domain you bought with us to your existing website by editing your domain settings using our site. Please follow the steps below:
 
1. Log in to your account on our website.

2. Go to the “My Projects” page via the drop down menu in the upper right hand corner on any page of our site (this should appear once you log in).

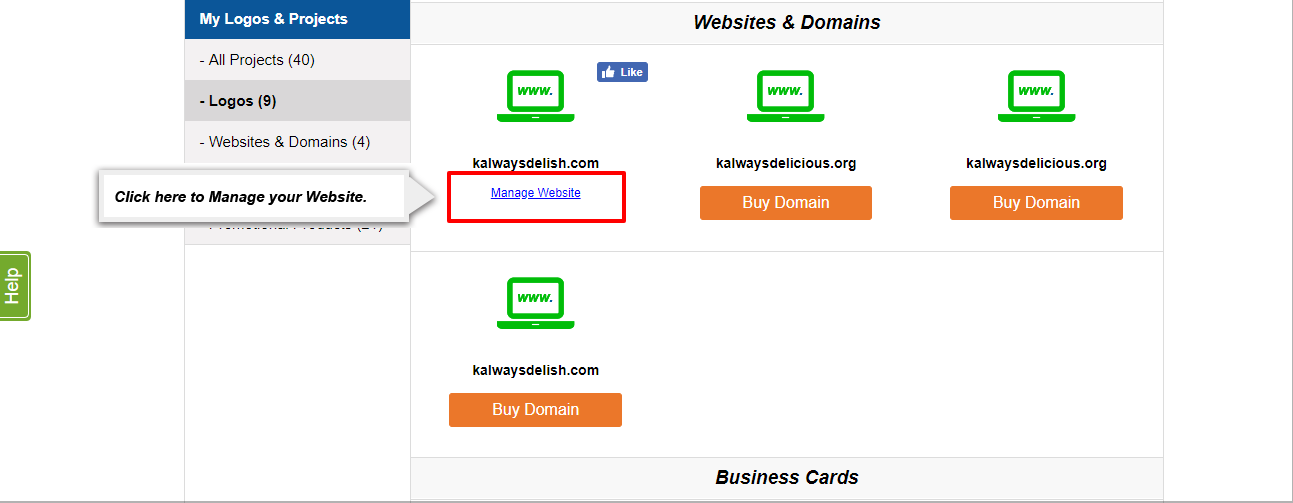
3. Locate the domain you registered on the left hand side. There will be a “Manage” button next to the domain you registered. Click on the “Manage” button to be taken to your domain management page.

 
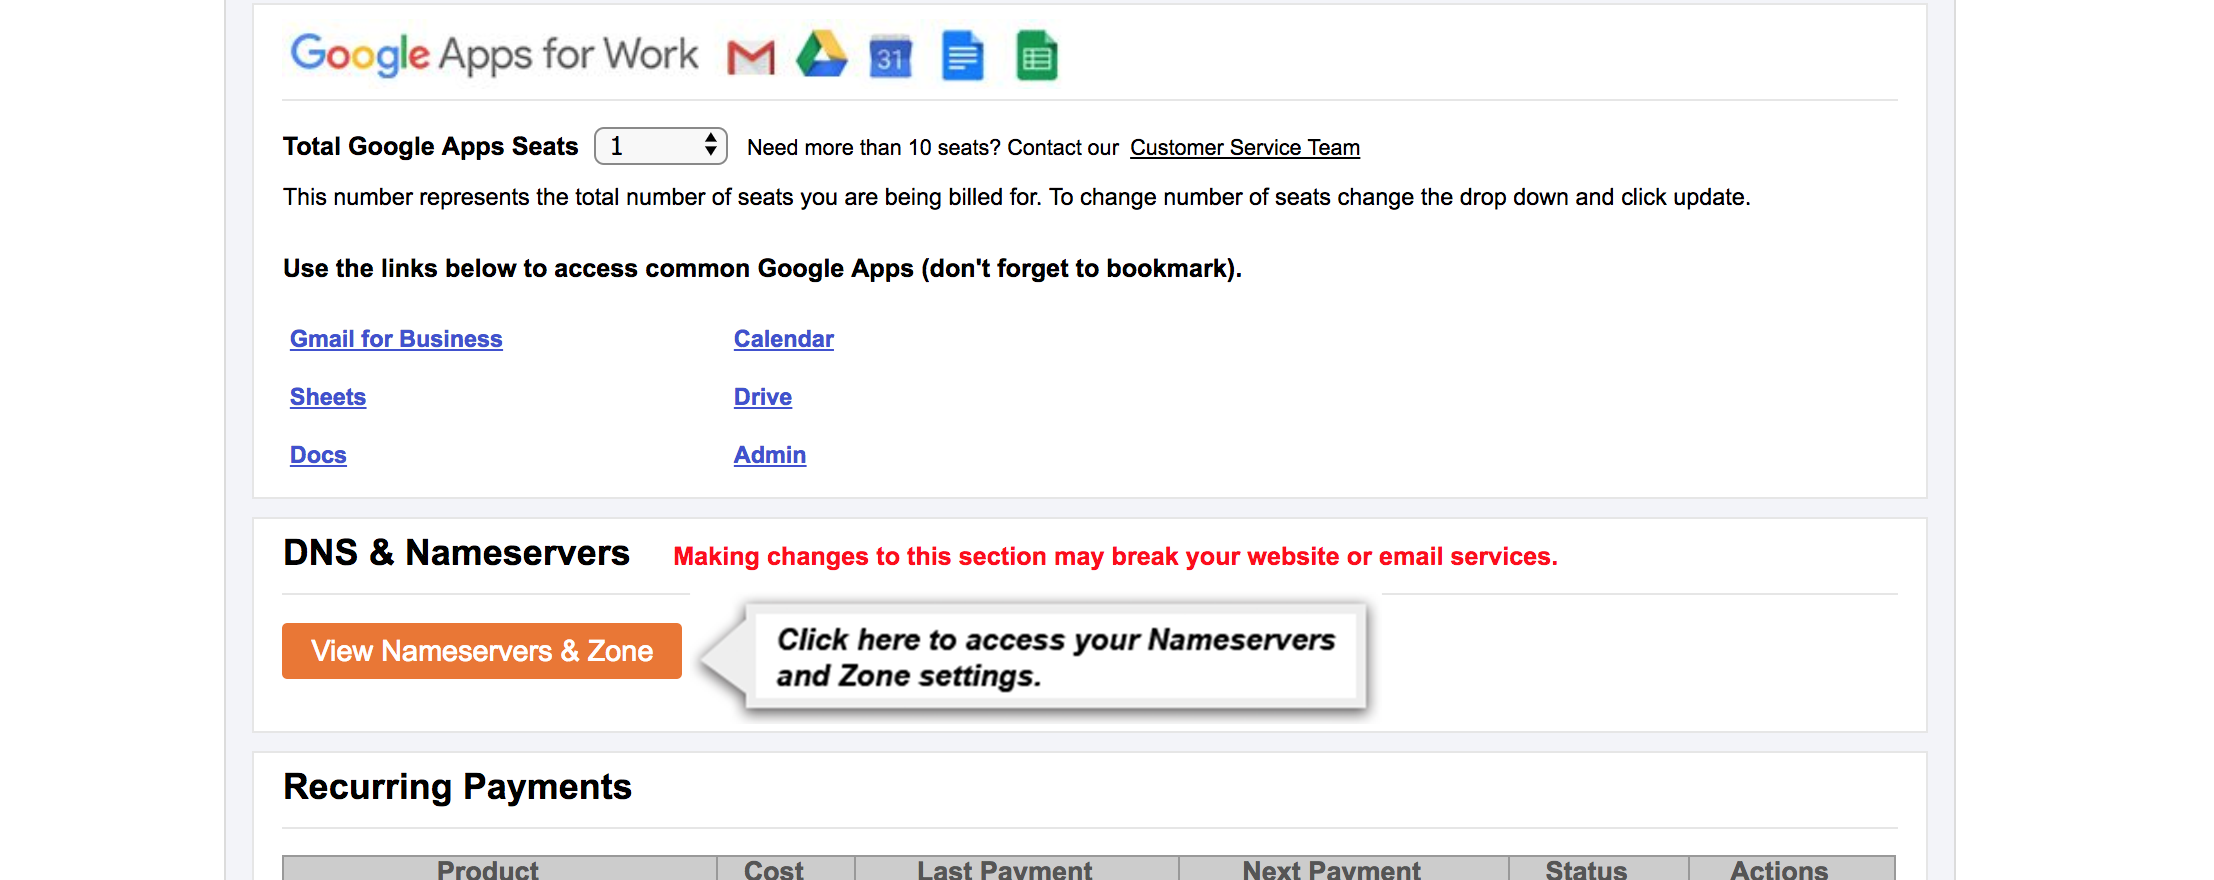
4.  Once on the “Manage My Domain” page, scroll down to where it says “DNS & Nameservers”. Please click “View Nameservers & Zone”. In the following screen, you can edit your nameserver addresses or the Zone File/DNS records for your domain. Please contact your website provider for the best method to use to point your domain to their services. Common methods used to point a domain to a hosting provider or an existing website are:
 
  1. Changing nameserver addresses,
  2. Using a 301 redirect, or
  3. Modifying A records by pointing them to specific IP addresses.


Warning: Making changes to this section may break the website or email services that you have with us. We recommend using A records or CNAME records rather than changing Nameserver addresses in order to preserve the services you may have with us.
Using a Domain You Bought Elsewhere
keyboard_arrow_right

If you already bought your website domain from another company, you can still use that domain for a website package that you purchase from us. In order to do use that domain, you'll need to update your DNS settings with the company you bought your domain from to point to our servers. While it sounds complicated, it's like telling the internet "My Company" is located at "123 Main St, Sometown, NY" so that it knows where to find your website.

There are two options to take care of this change:

Option 1: Ask your domain provider to do it for you!

Most domain providers will do the work for you if you contact customer support. If they won't do all the work for you they'll be able to give you good instructions. Copy and paste the request below.

I made a website using another company and need to point my domain to their servers.  Can you set this up or walk me through the process of making these changes?  I need to change my A-Records for both "www" and my root domain. That's one record for 
www.mydomain.com pointing to 199.34.228.59. And one record for mydomain.com also pointing to 199.34.228.59. Note that I want to keep using you as my domain registrar.  I am not requesting a transfer and do not have new name servers to provide you. 

Option 2: Do it Yourself

It's hard for us to provide do-it-yourself instructions as every company that sells domains has things set up differently. What we can tell you is that you need to set up. 

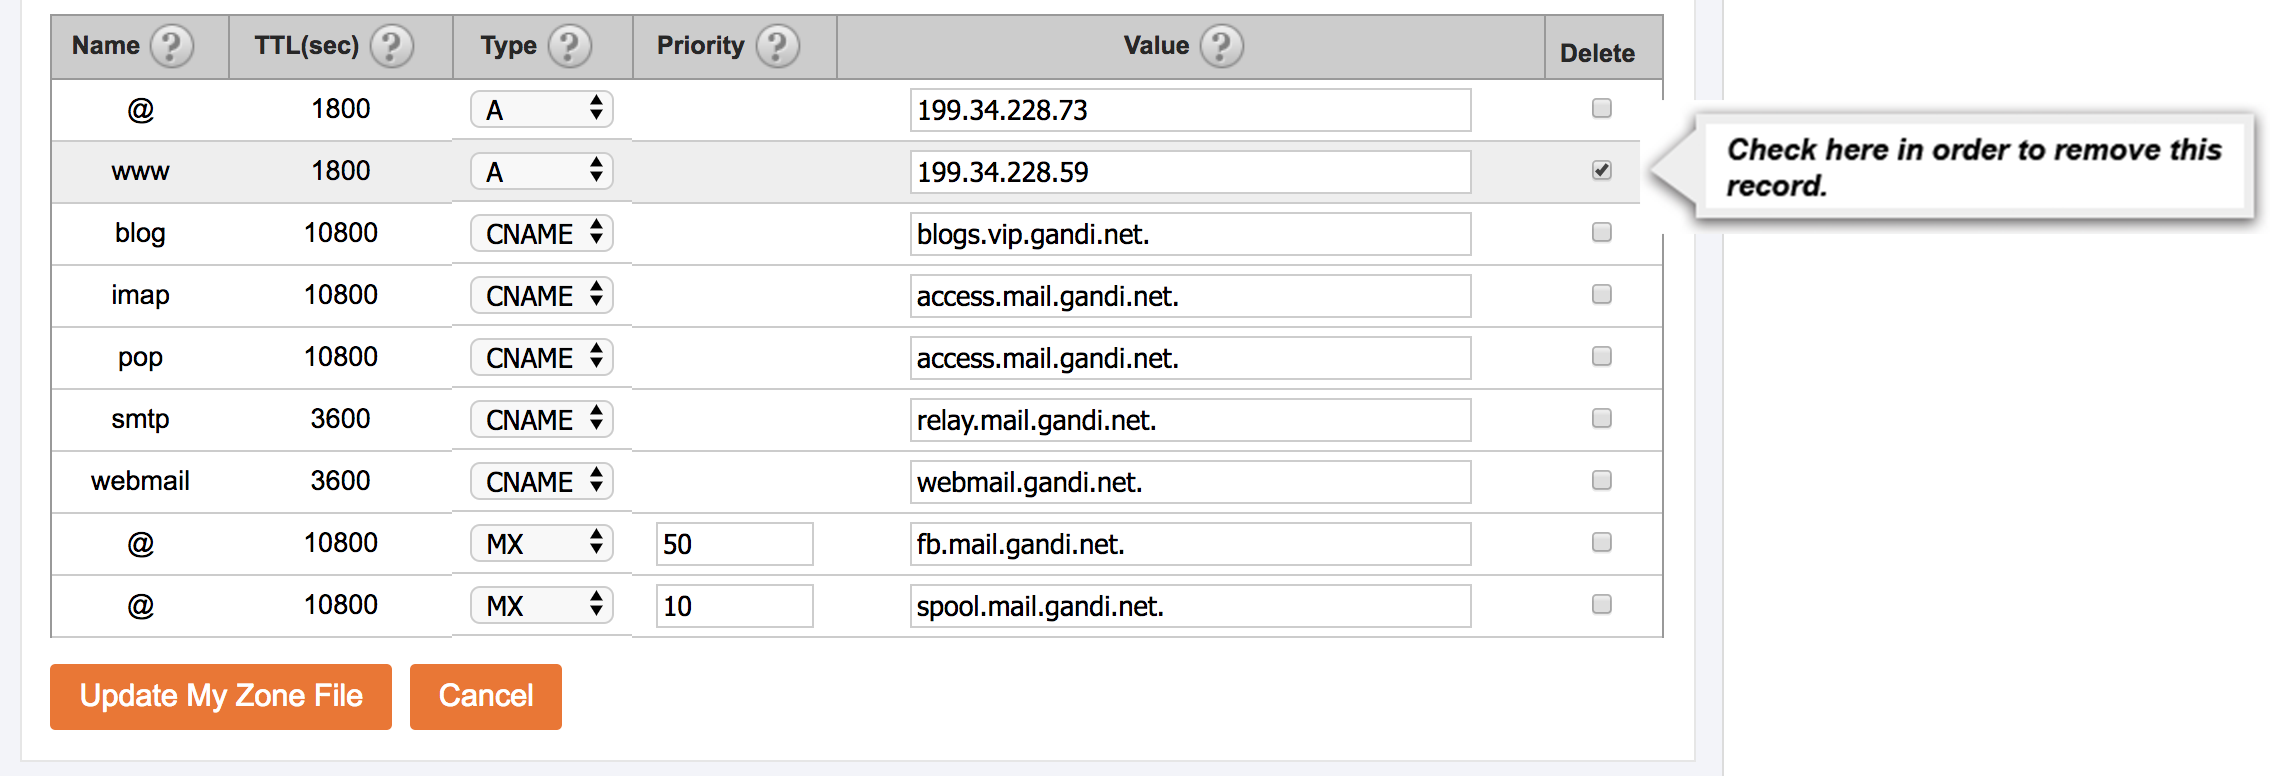
Right now you'll see something like this in your DNS settings:
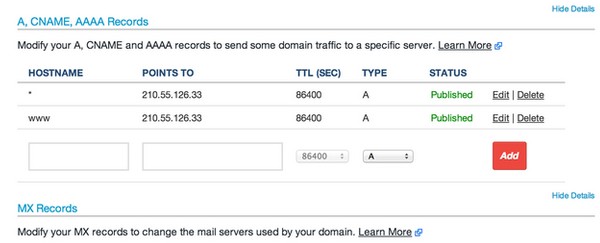
Menu of Sample DNS Server A Records

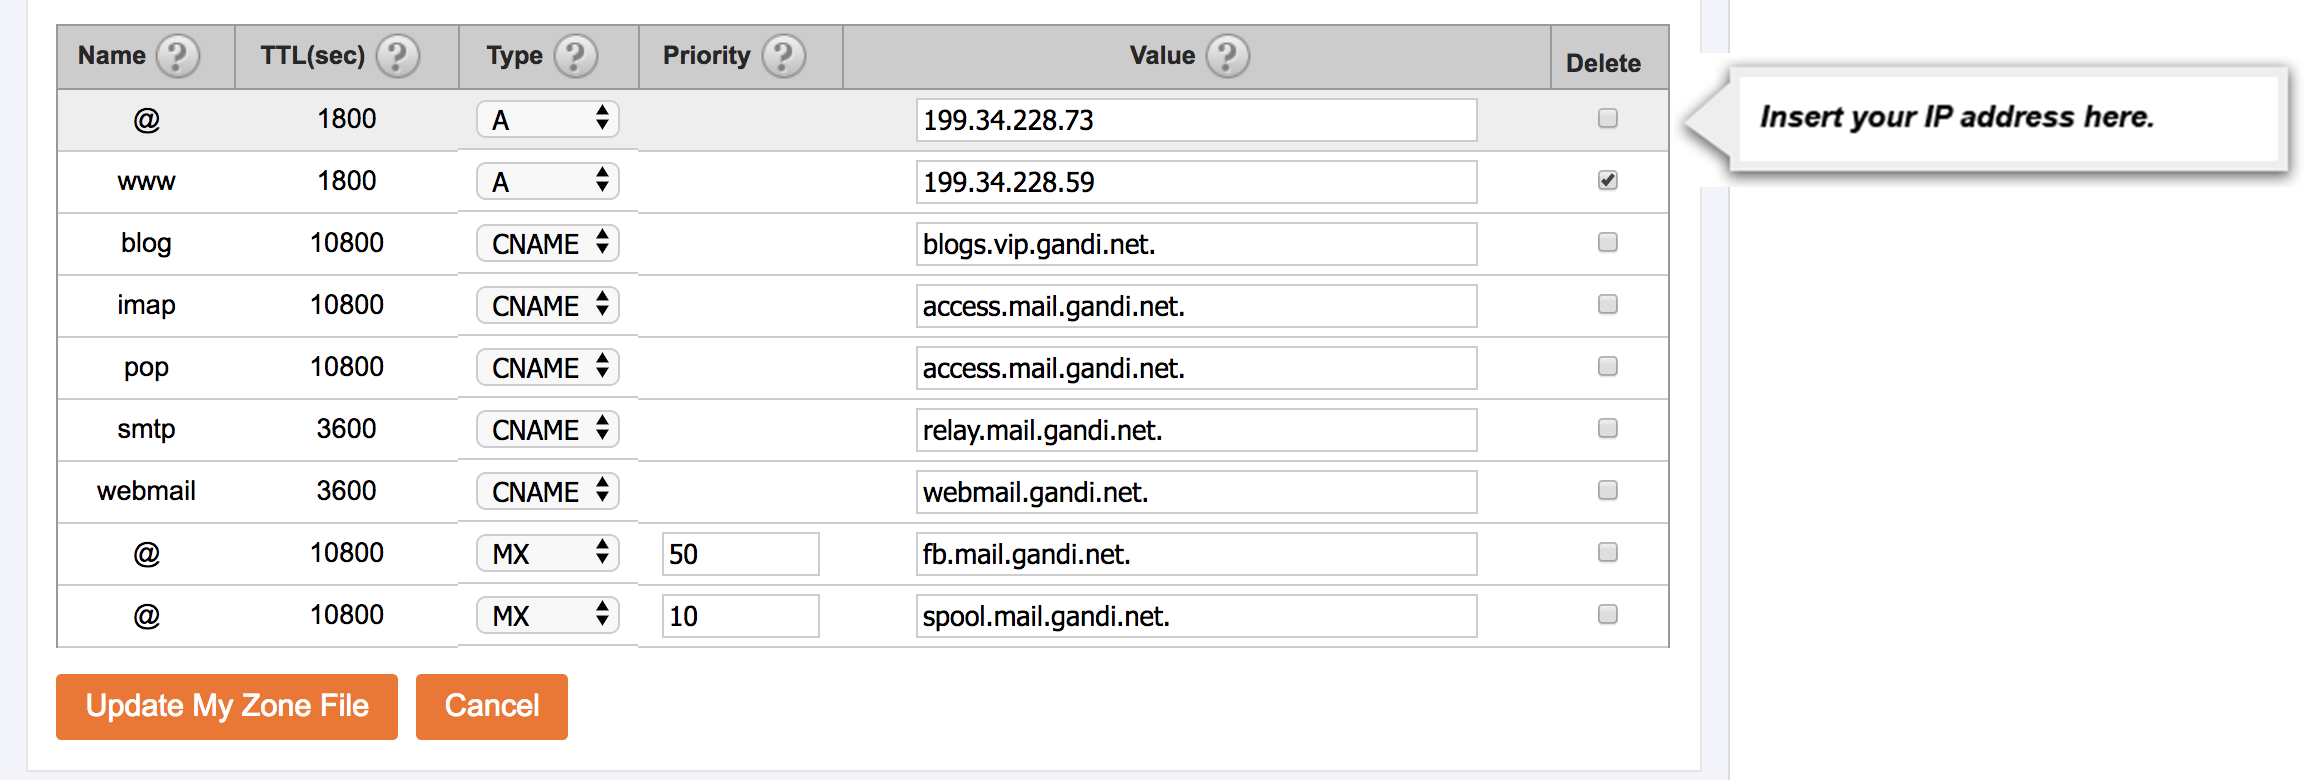
You need to edit both the * and www hostnames to point to 199.34.228.59. In some cases, you may not have a * hostname and instead have a @ hostname, if so you'll need to change the @ and www hostnames. You may also see hostnames of yourdomain.com and www.yourdomain.com, in this case, you'll need to update both of those. When done, you'll end up seeing something like this. 
 Menu of Sample DNS Server A Records

How do I connect my domain to my site hosted with GoDaddy?
keyboard_arrow_right
Connecting Your Domain to GoDaddy’s Hosting Server

Connecting your domain name to a hosting server allows you to create and publish a website for the public to see. Hosting your website is essential for allowing public access to internet users and to be found on the world wide web. Connecting your domain allows you to keep your domain name subscription with a trusted domain provider while using the hosting services and website tools of another company, like GoDaddy.
To connect your domain to GoDaddy, please follow this step-by-step guide:

1. Sign into your account on our site.


2. Click “Manage Website” for the Domain Name you would like to alter.

Opens a new windowArrow Pointing to Manage Website on My Projects Page


3. Click “View Nameservers & Zone” within the DNS & Nameservers Section.
Opens a new windowArrow Pointing to DNS and Nameservers section on Website management Page


4. Click “Edit My Zone File”
Opens a new windowArrow Pointing to Edit My DNS link


5. Click on the Delete checkbox next to the www A Record set to 199.34.228.59
Opens a new windowArrow Pointing to Delete Checkbox to delete a DNS record


6. Find your Website’s IP Address. For instructions on how to find your GoDaddy Website IP Address click here.


7. Change the value of the @ A Record to your website’s IP address.
Opens a new windowArrow Showing Where to Add IP Address on A Record


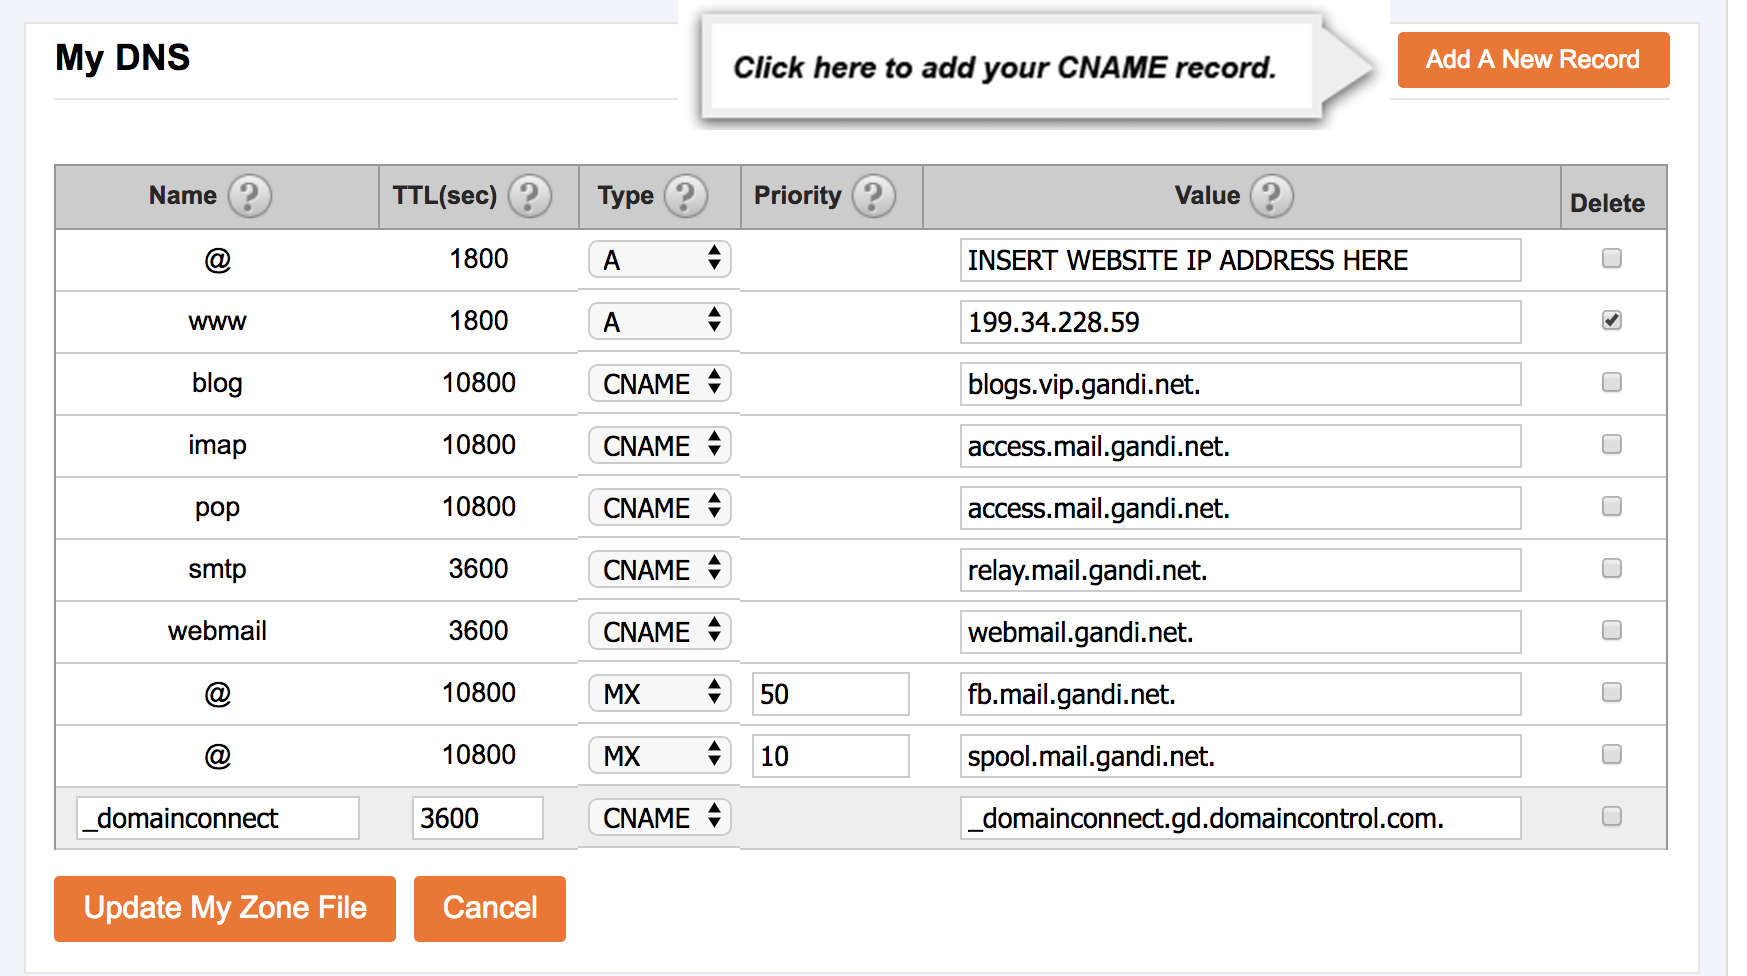
8. Click “Add A New Record”. Write the Name of this new record as _domainconnect, set the TTL to 3600, and set the Type to CNAME. Then write the value as _domainconnect.gd.domaincontrol.com.
Opens a new windowArrow Pointing to Add A New Record Button to add CNAME Record


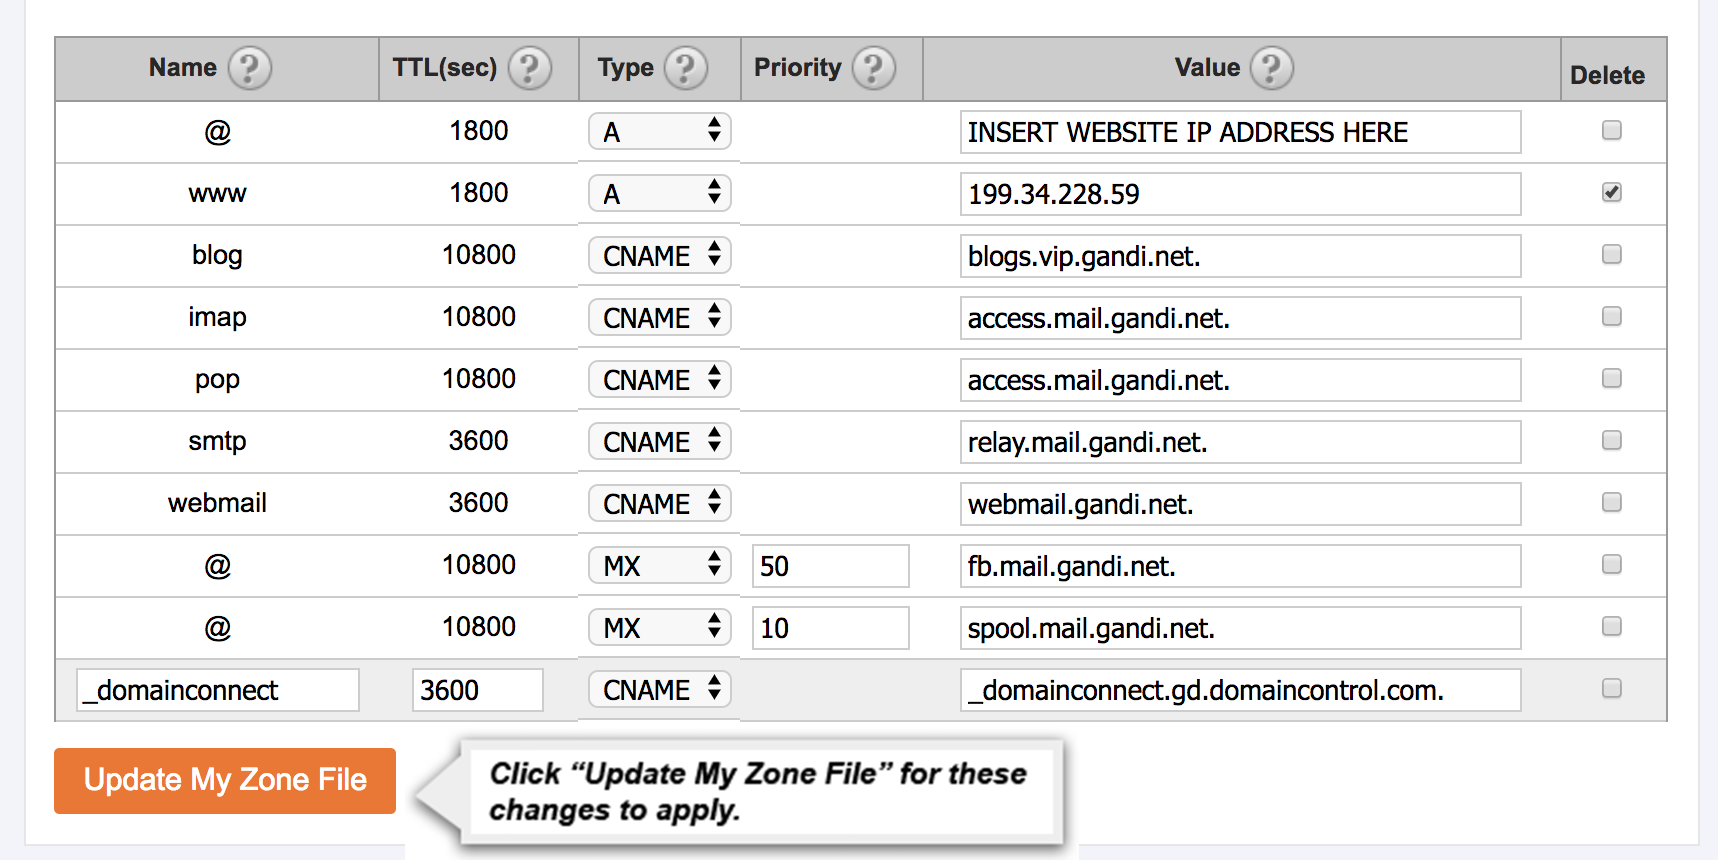
9. Click “Update My Zone File”Opens a new windowArrow Pointing to Update My Zone File button to update DNS
 

If you have any trouble connecting your domain to GoDaddy please contact customer service by using the "Submit A Request" in the top right corner. 
 
How do I connect my domain to my site hosted with Shopify?
keyboard_arrow_right
Connecting Your Domain to Shopify’s Hosting Server
 

Connecting your domain name to a hosting server allows you to create and publish a website for the public to see. Hosting your website is essential for allowing public access to internet users and to be found on the world wide web. Connecting your domain allows you to keep your domain name subscription with a trusted domain provider while using the hosting services and website tools of another company, like Shopify.
 

To connect your domain to Shopify, please follow this step-by-step guide:


1. Sign into your account on our site.


2. Click “Manage Website” for the Domain Name you would like to alter
Opens a new windowArrow Pointing to Manage Website on My Projects Page
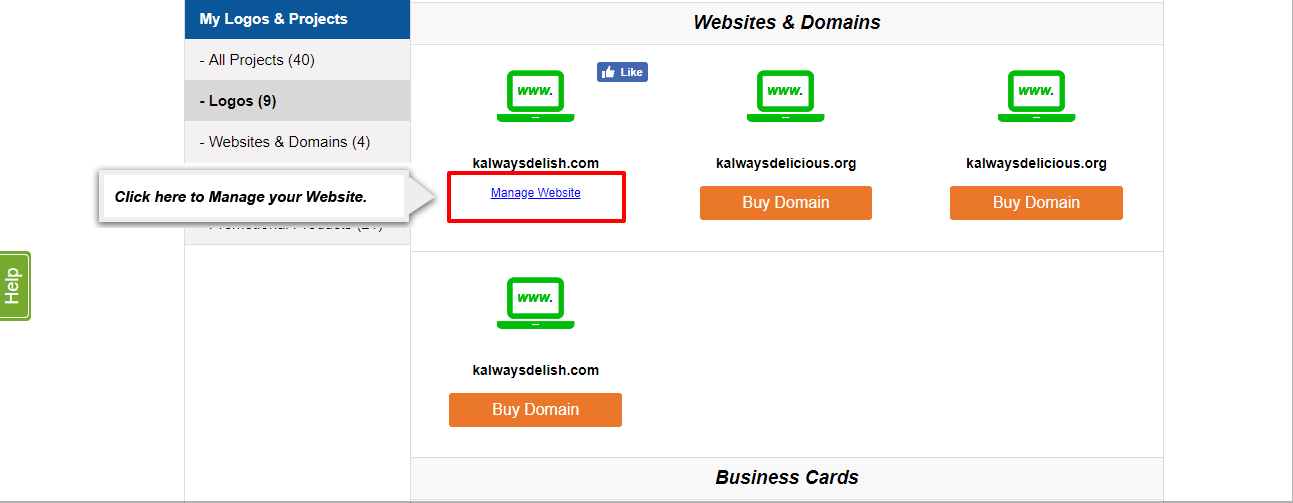


3. Click “View Nameservers & Zone” within the DNS & Nameservers Section.
Opens a new windowArrow Pointing to DNS and Nameservers section on Website management Page
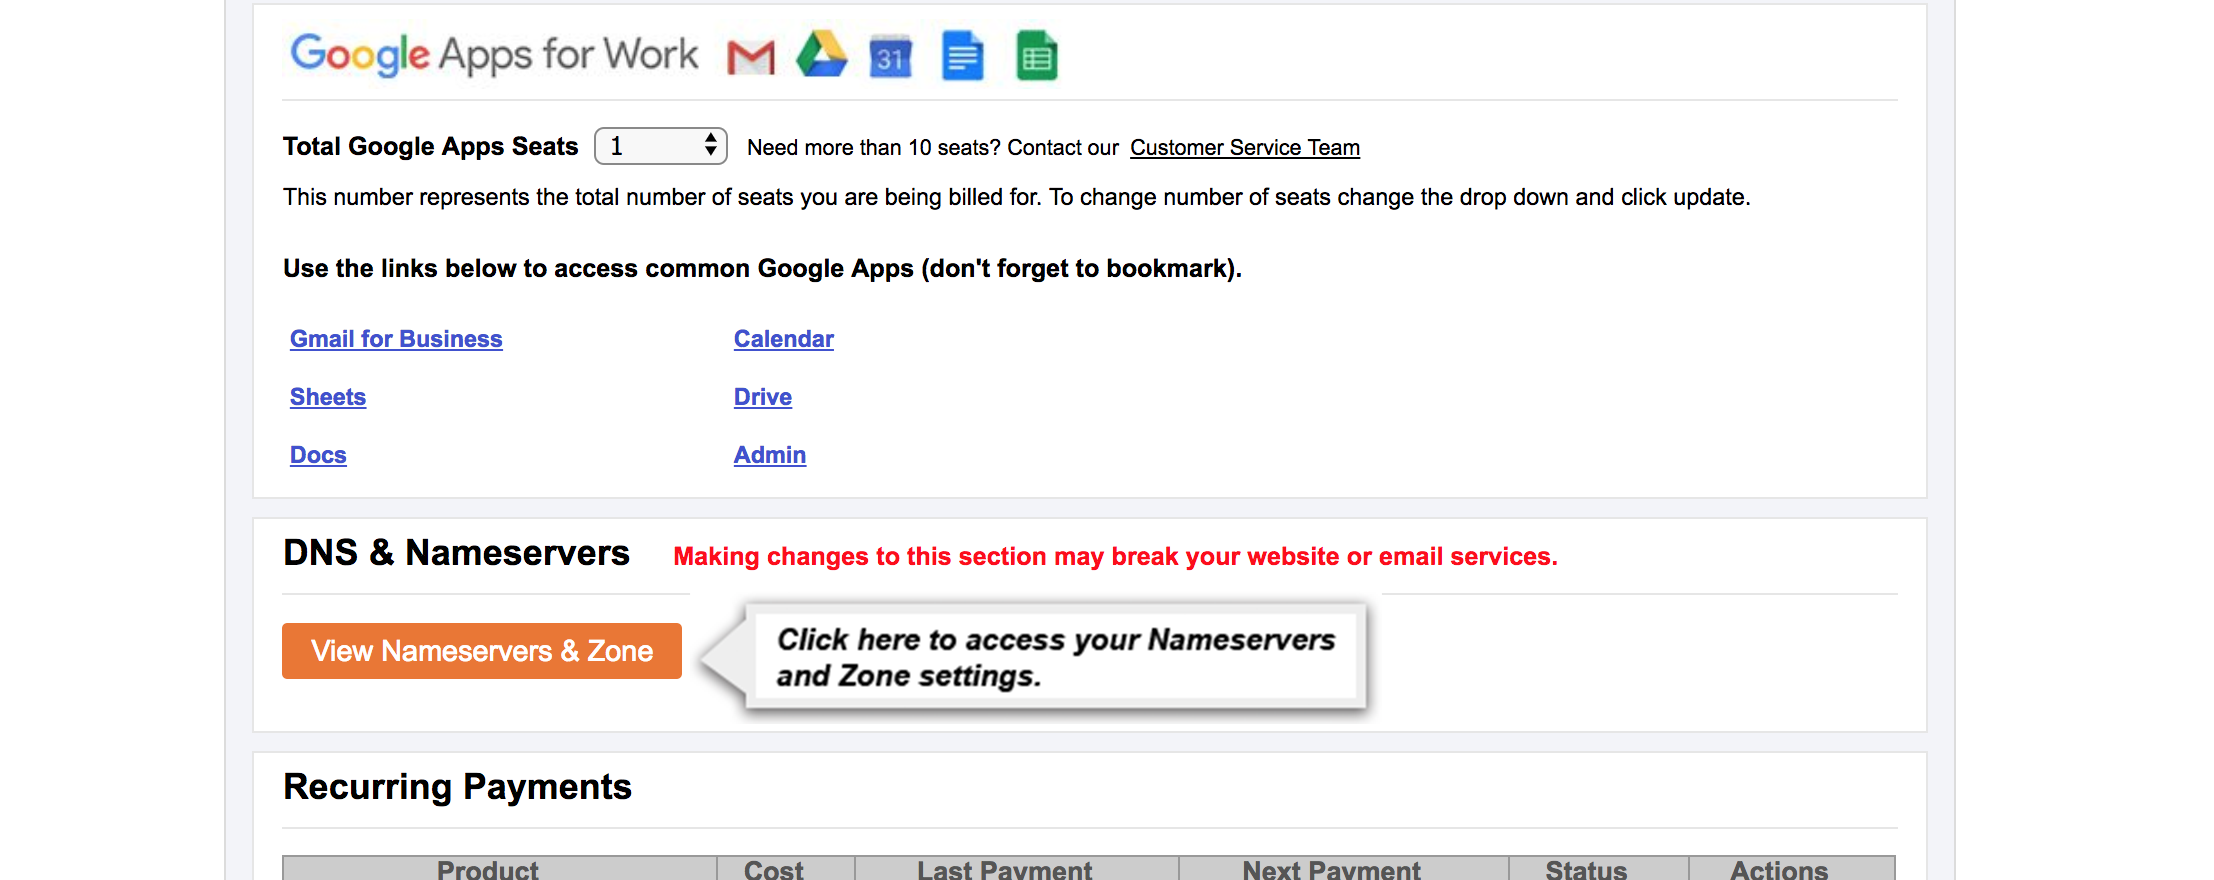


4. Click “Edit My Zone File”.
Opens a new windowArrow Pointing to Edit My Zone File link


5. Click on the Delete checkbox next to the www A Record set to 199.34.228.59
Opens a new windowArrow Pointing to Delete Checkbox to delete a DNS record
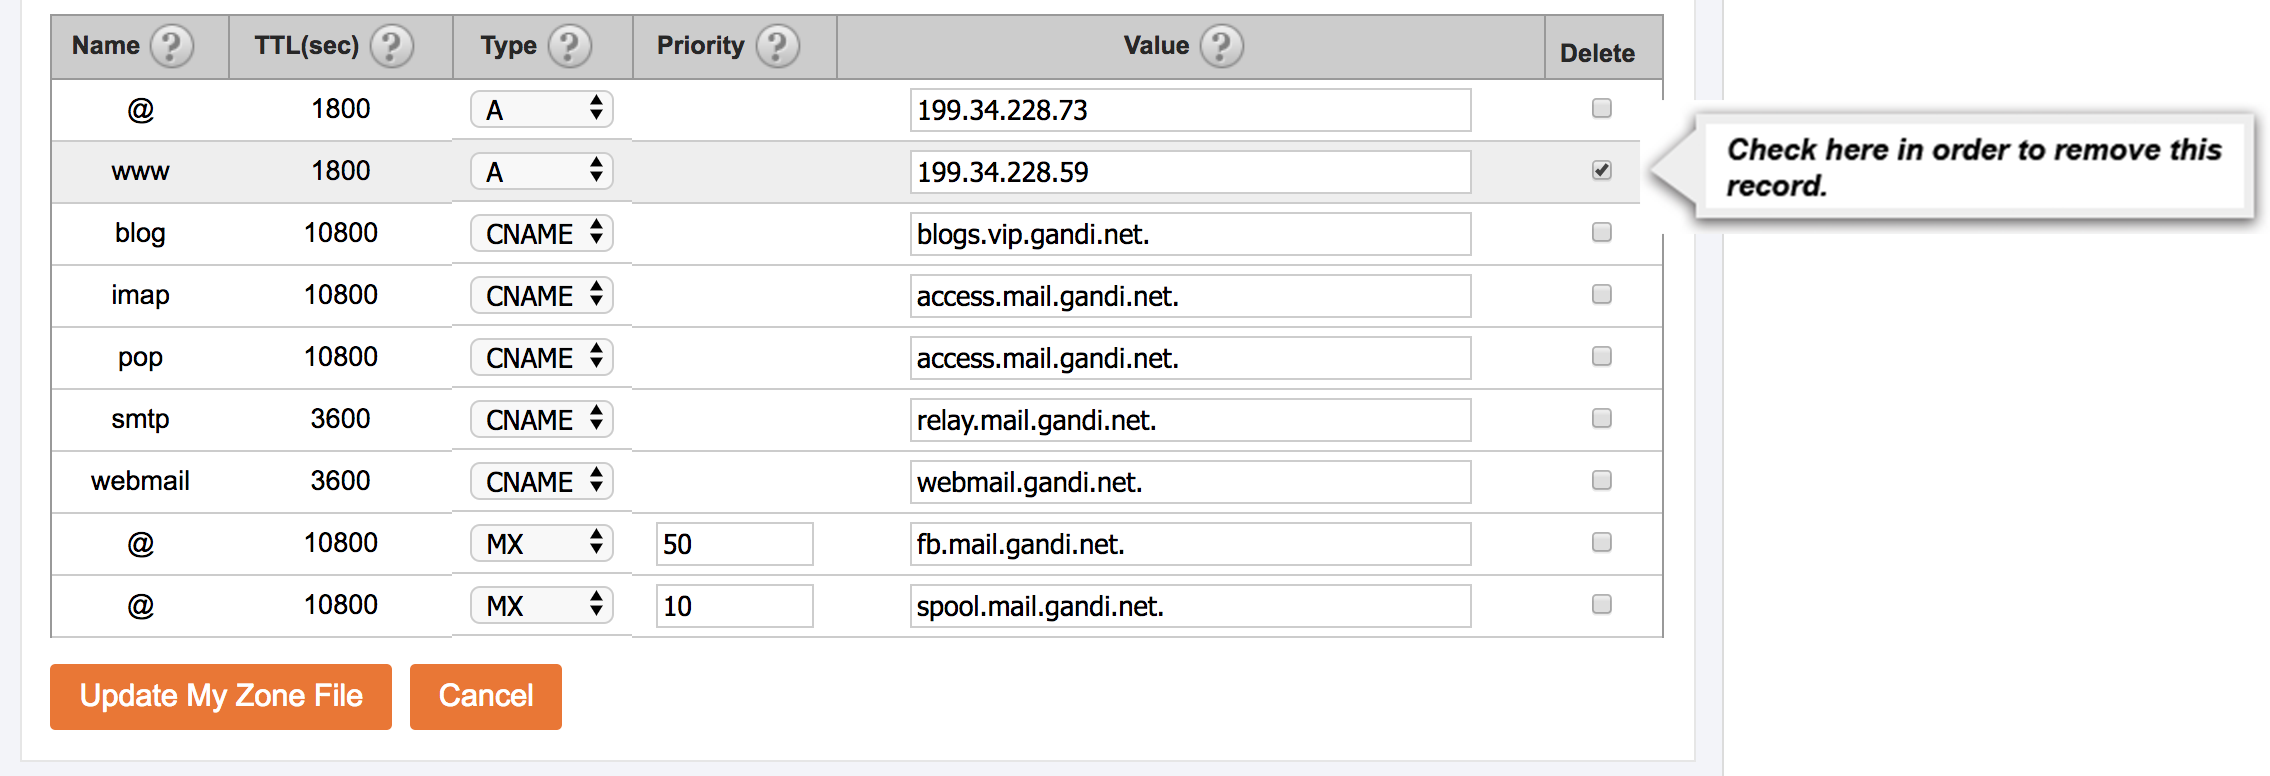


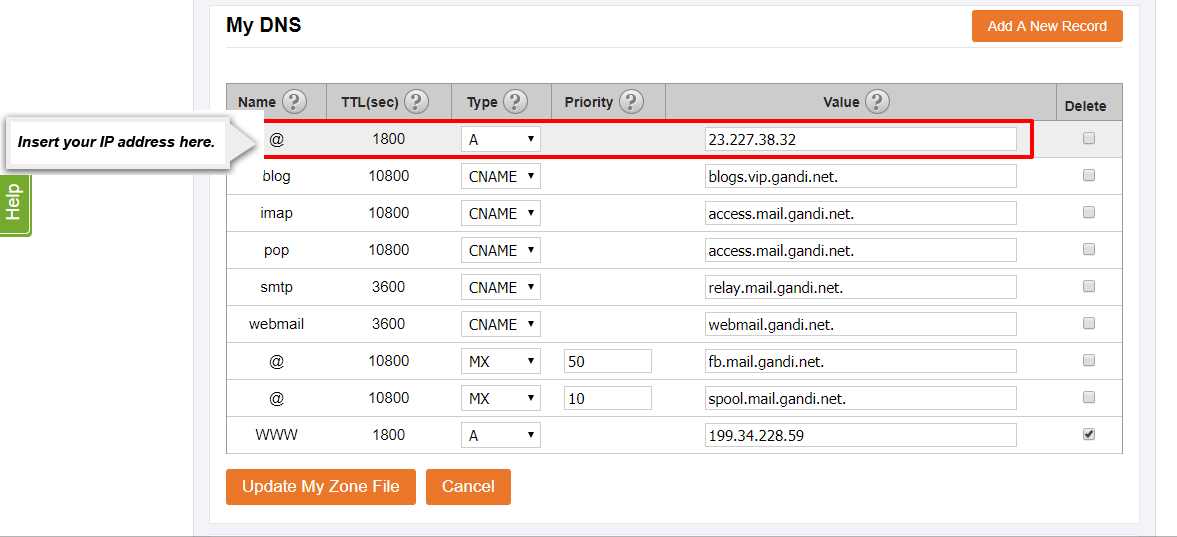
6. Change the value of the @ A Record to 23.227.38.32
Opens a new windowArrow Showing Where to Add IP Address on A Record


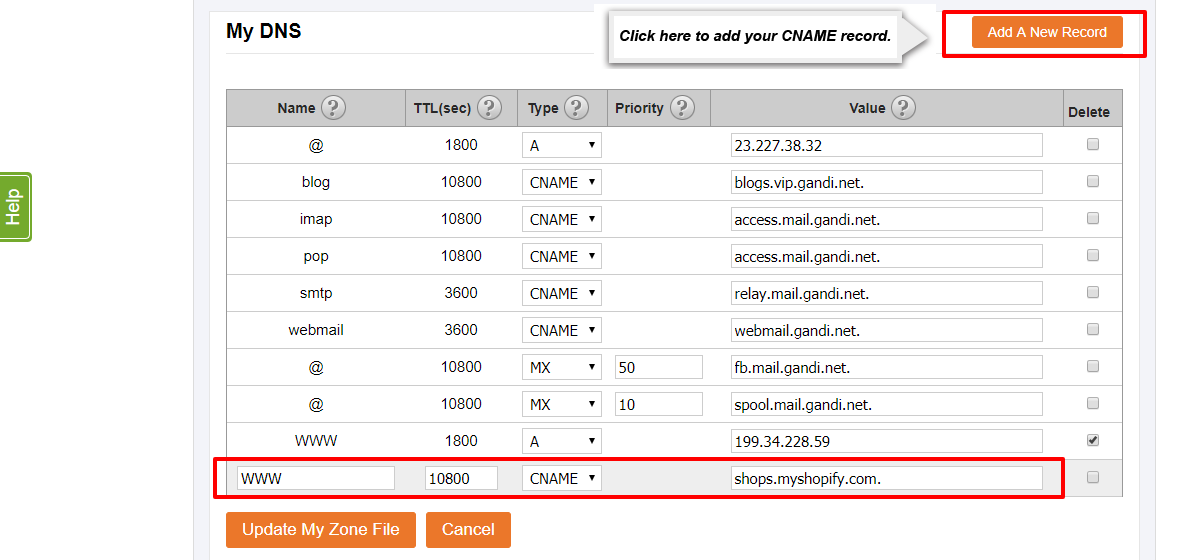
7. Click “Add A New Record”. Write the Name of this new record as www,  set the TTL to 10800, and set the Type to CNAME. Then write the value as shops.myshopify.com.
Opens a new windowArrow Pointing to Add A New Record Button to add CNAME Record


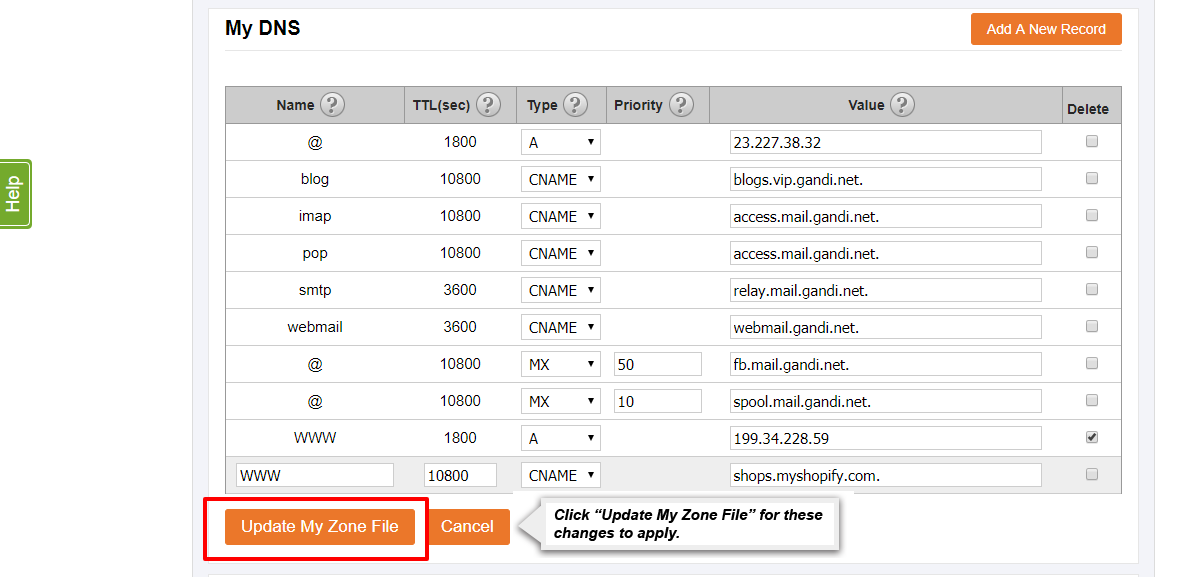
8. Click “Update My Zone File”.
Opens a new windowArrow Pointing to Update My Zone File button to update DNS


If you have any trouble connecting your domain to Shopify please contact customer service by using the "Submit A Request" in the top right corner. 
How do I connect my domain to my site hosted with SquareSpace?
keyboard_arrow_right
Connecting Your Domain to SquareSpace’s Hosting Server

Connecting your domain name to a hosting server allows you to create and publish a website for the public to see. Hosting your website is essential for allowing public access to internet users and to be found on the world wide web. Connecting your domain allows you to keep your domain name subscription with a trusted domain provider while using the hosting services and website tools of another company, like Squarespace.
To connect your domain to SquareSpace, please follow this step-by-step guide:

1. Sign into your account on our site.


2. Click “Manage Website” for the Domain Name you would like to alter.
Arrow Pointing to Manage Website on My Projects PageOpens a new window


3. Click “View Nameservers & Zone” within the DNS & Nameservers Section.
Arrow Pointing to DNS and Nameservers section on Website management PageOpens a new window


4. Click “Edit My Zone File”.
Arrow Pointing to Edit My Zone File linkOpens a new window


5. Click on the Delete checkbox next to the www A Record set to 199.34.228.59
Arrow Pointing to Delete Checkbox to delete a DNS recordOpens a new window


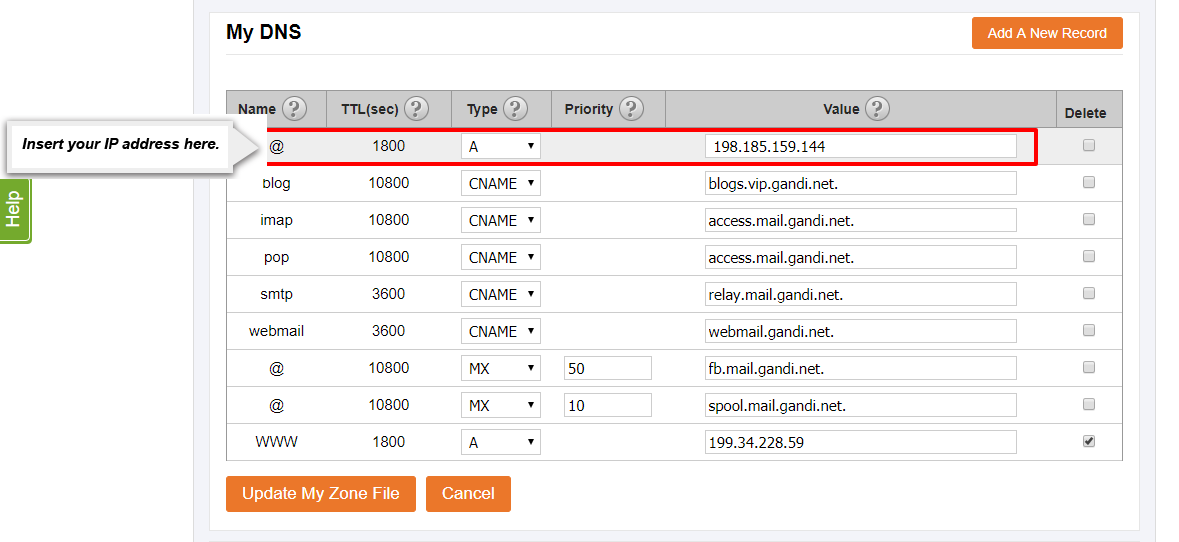
6. Change the value of the @ A Record to 198.185.159.144
Arrow Showing Where to Add IP Address on A RecordOpens a new window


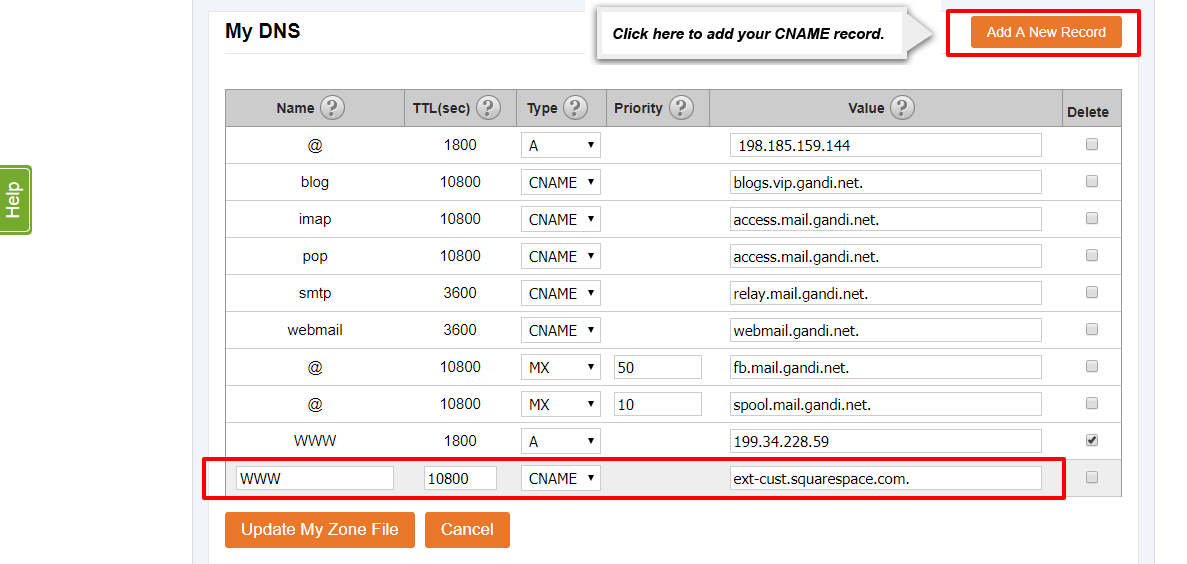
7. Click “Add A New Record”. Write the Name of this new record as www, set the TTL to 10800, and set the Type to CNAME. Then write the value as ext-cust.squarespace.com.
Arrow Pointing to Add A New Record Button to add CNAME RecordOpens a new window


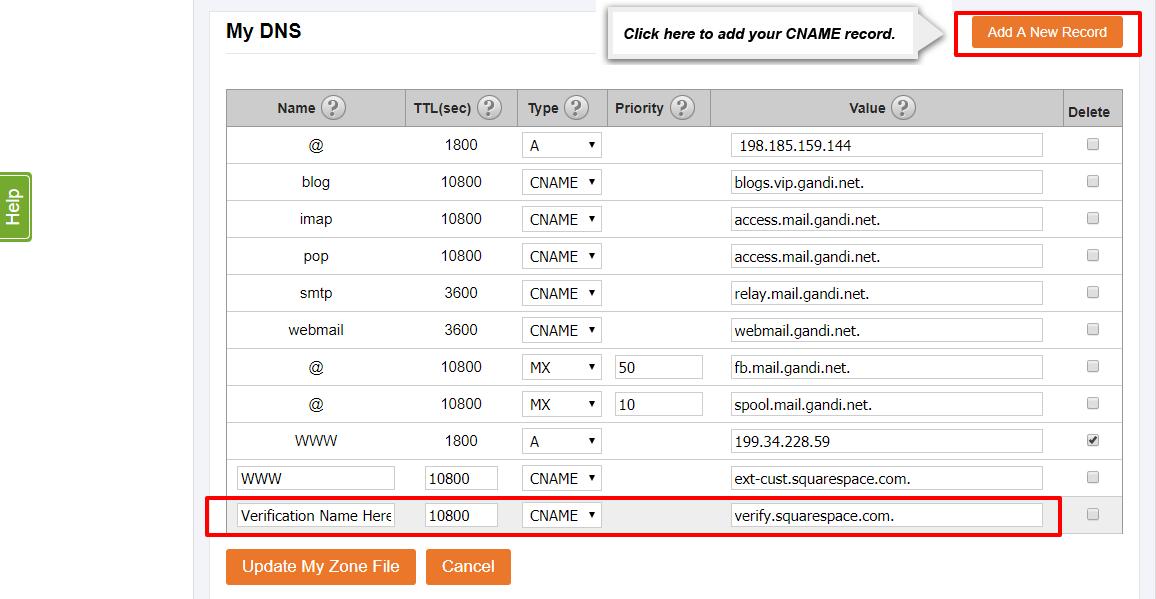
8. Click “Add A New Record”. Set the TTL to 10800, and set the Type to CNAME and write the value as verify.squarespace.com.  Copy the SquareSpace Verification Name found in the first line of your SquareSpace DNS Settings, and paste this string of letters and numbers into this record’s Name spot. (If you need assistance finding your SquareSpace DNS Records please follow Steps 1-3 of this guide: Click Here For Guide)
Arrow Pointing to Add A New Record Button to add CNAME RecordOpens a new window


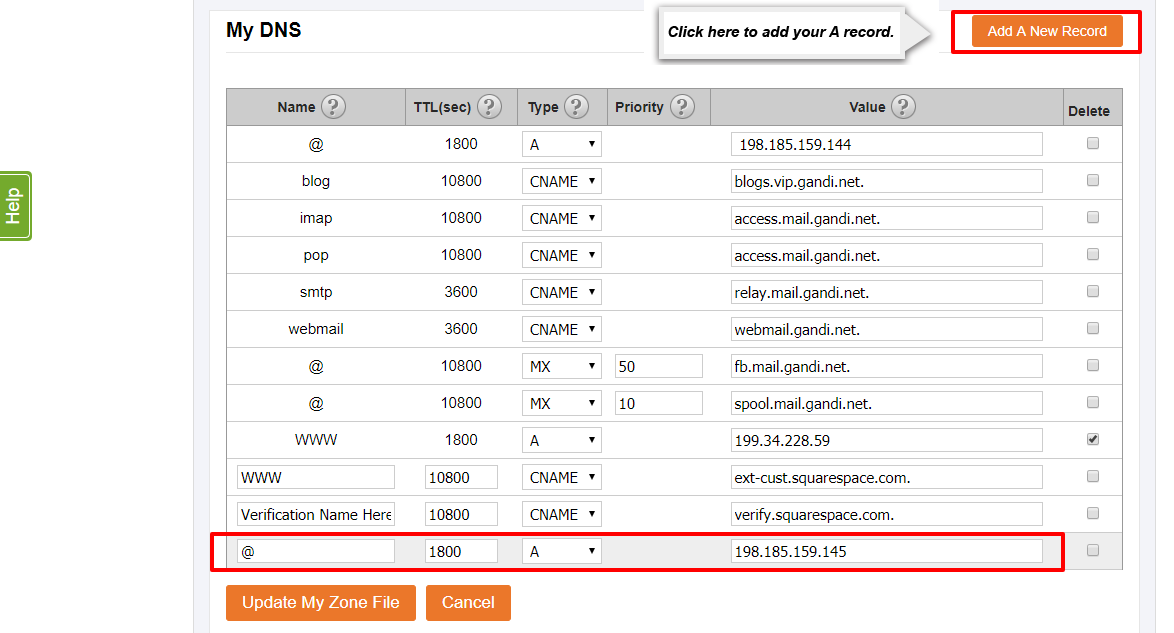
9. Click “Add A New Record”. Write the Name of this new record as @, set the TTL to 1800, set the Type to A and write the value as 198.185.159.145
Arrow Pointing to Add A New Record Button to add CNAME RecordOpens a new window


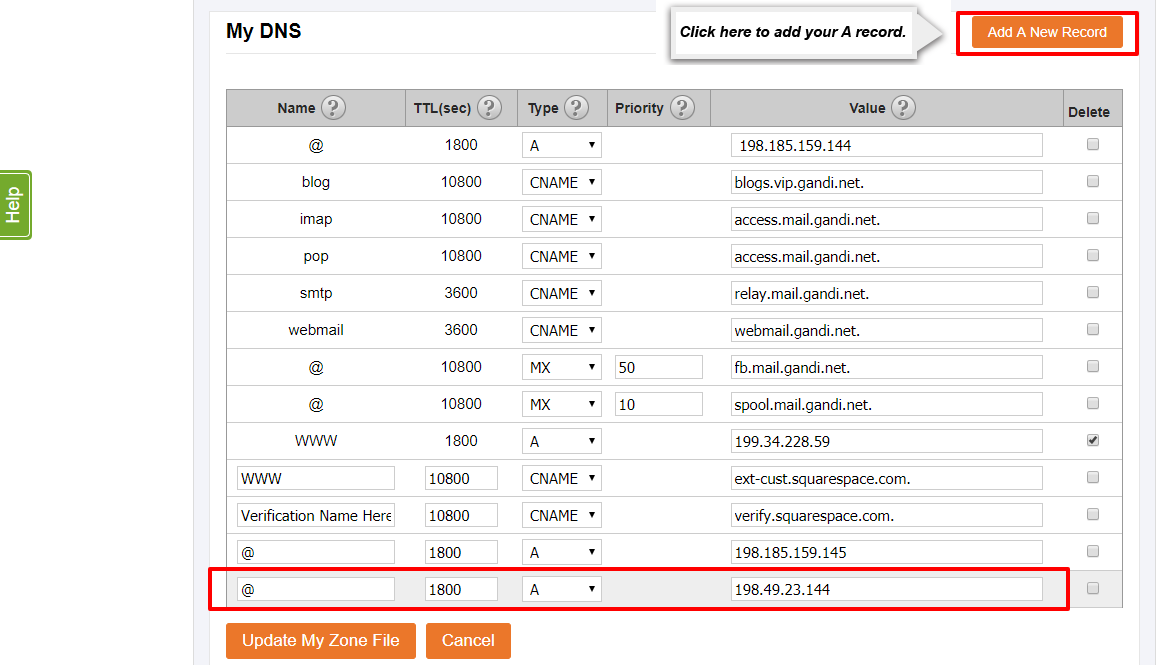
10. Click “Add A New Record”. Write the Name of this new record as @, set the TTL to 1800, set set the Type to A and write the value as 198.49.23.144
Arrow Pointing to Add A New Record Button to add CNAME RecordOpens a new window


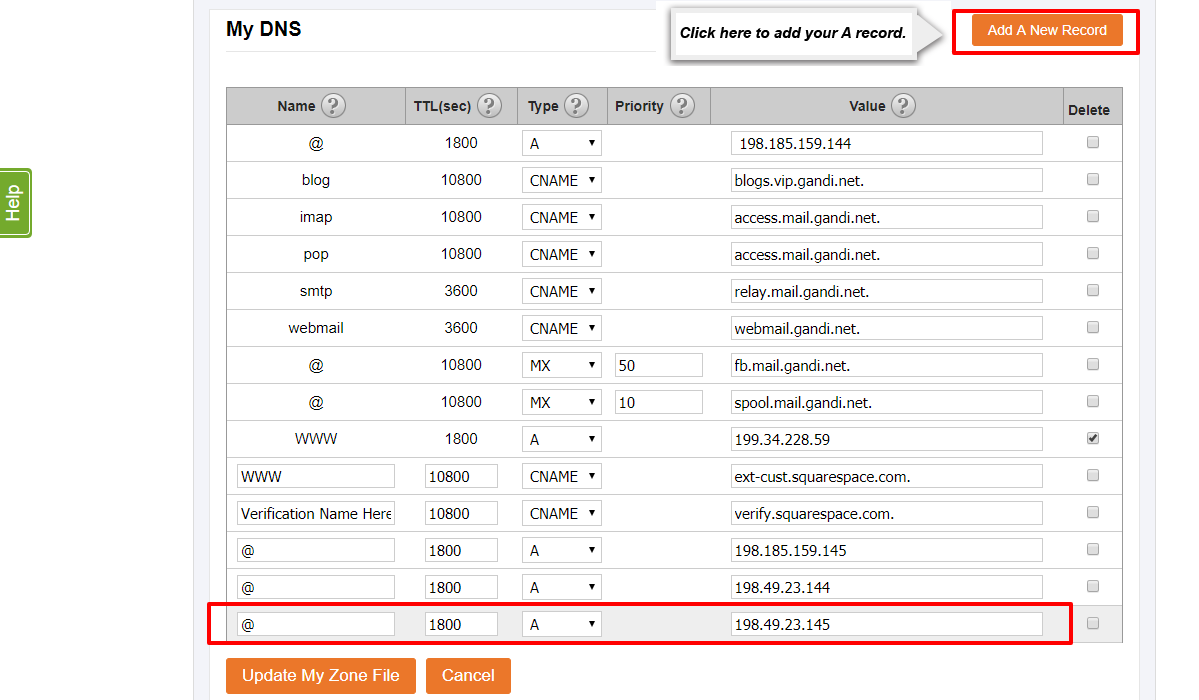
11. Click “Add A New Record”. Write the Name of this new record as @, set the TTL to 1800, set the Type to A and write the value as 198.49.23.145
Arrow Pointing to Add A New Record Button to add CNAME RecordOpens a new window


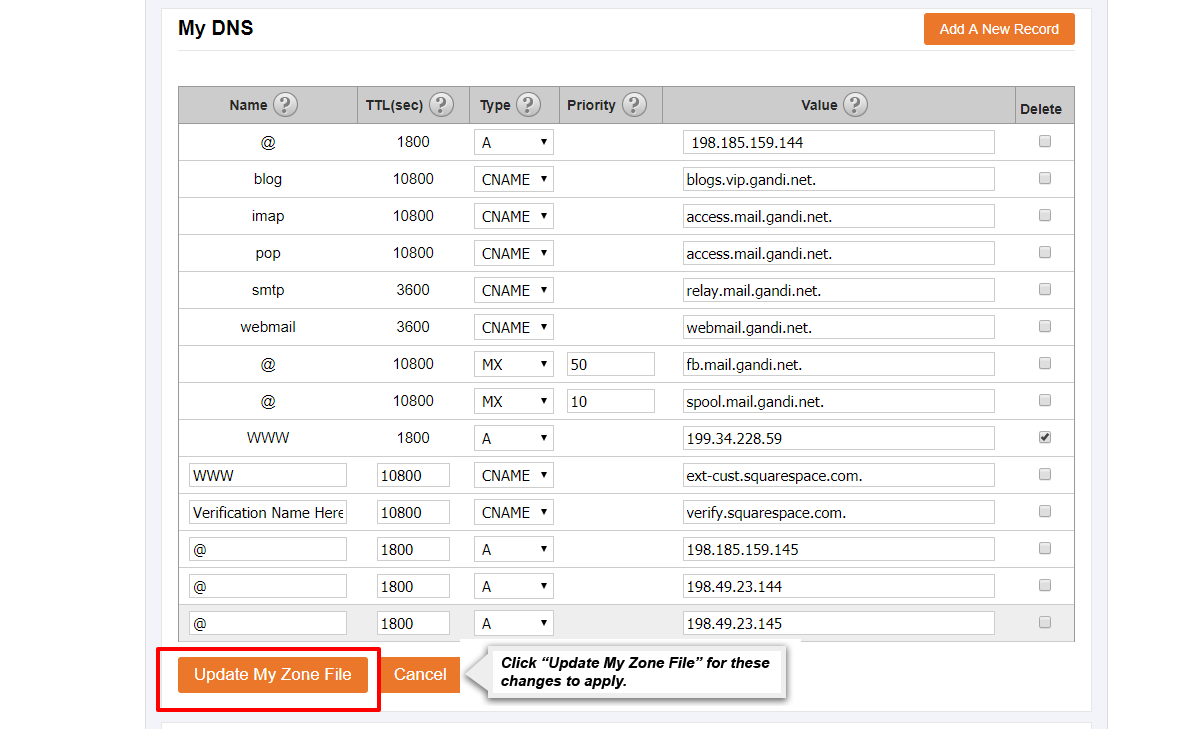
12. Click “Update My Zone File”.
Arrow Pointing to Add A New Record Button to add CNAME RecordOpens a new window

If you have any trouble connecting your domain to SquareSpace please contact customer service by using the "Submit A Request" in the top right corner. 
How do I connect my domain to my site hosted with Wix?
keyboard_arrow_right

Connecting Your Domain to Wix’s Hosting Server

Connecting your domain name to a hosting server allows you to create and publish a website for the public to see. Hosting your website is essential for allowing public access to internet users and to be found on the world wide web. Connecting your domain allows you to keep your domain name subscription with a trusted domain provider while using the hosting services and website tools of another company, like Wix.


Before you can connect your domain to Wix please make sure you have the following:


To connect your domain to Wix, please follow this step-by-step guide:


1. Sign into your account on our site.


2. Click “Manage Website” for the Domain Name you would like to alter.
Opens a new windowArrow Pointing to Manage Website on My Projects Page


3. Click “View Nameservers & Zone” within the DNS & Nameservers Section.
Opens a new windowArrow Pointing to DNS and Nameservers section on Website management Page


4. Click “Edit My Zone File”.
Opens a new windowArrow Pointing to Edit My Zone File link


5. Find your Wix Name Server Records here.


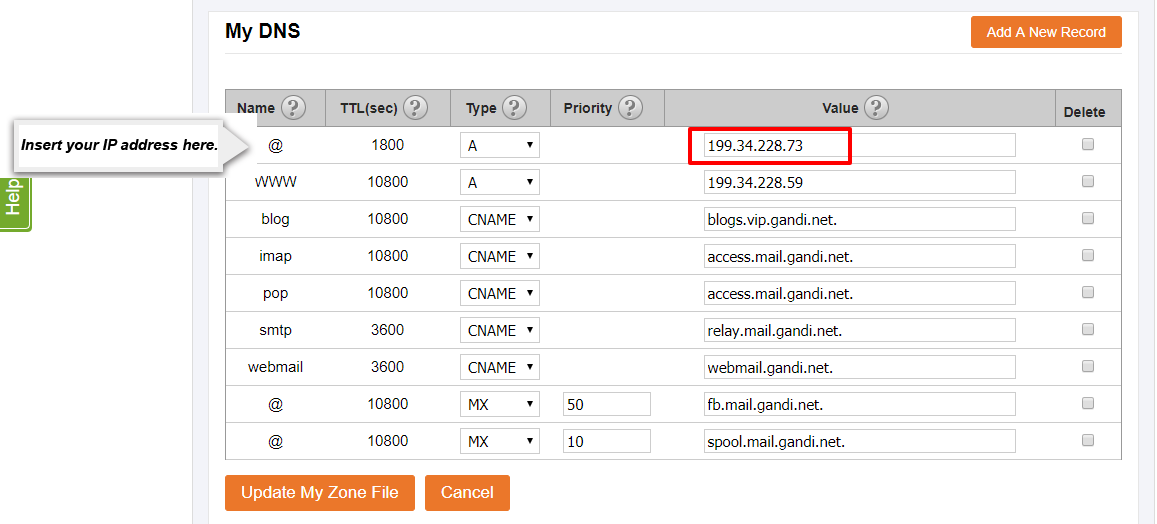
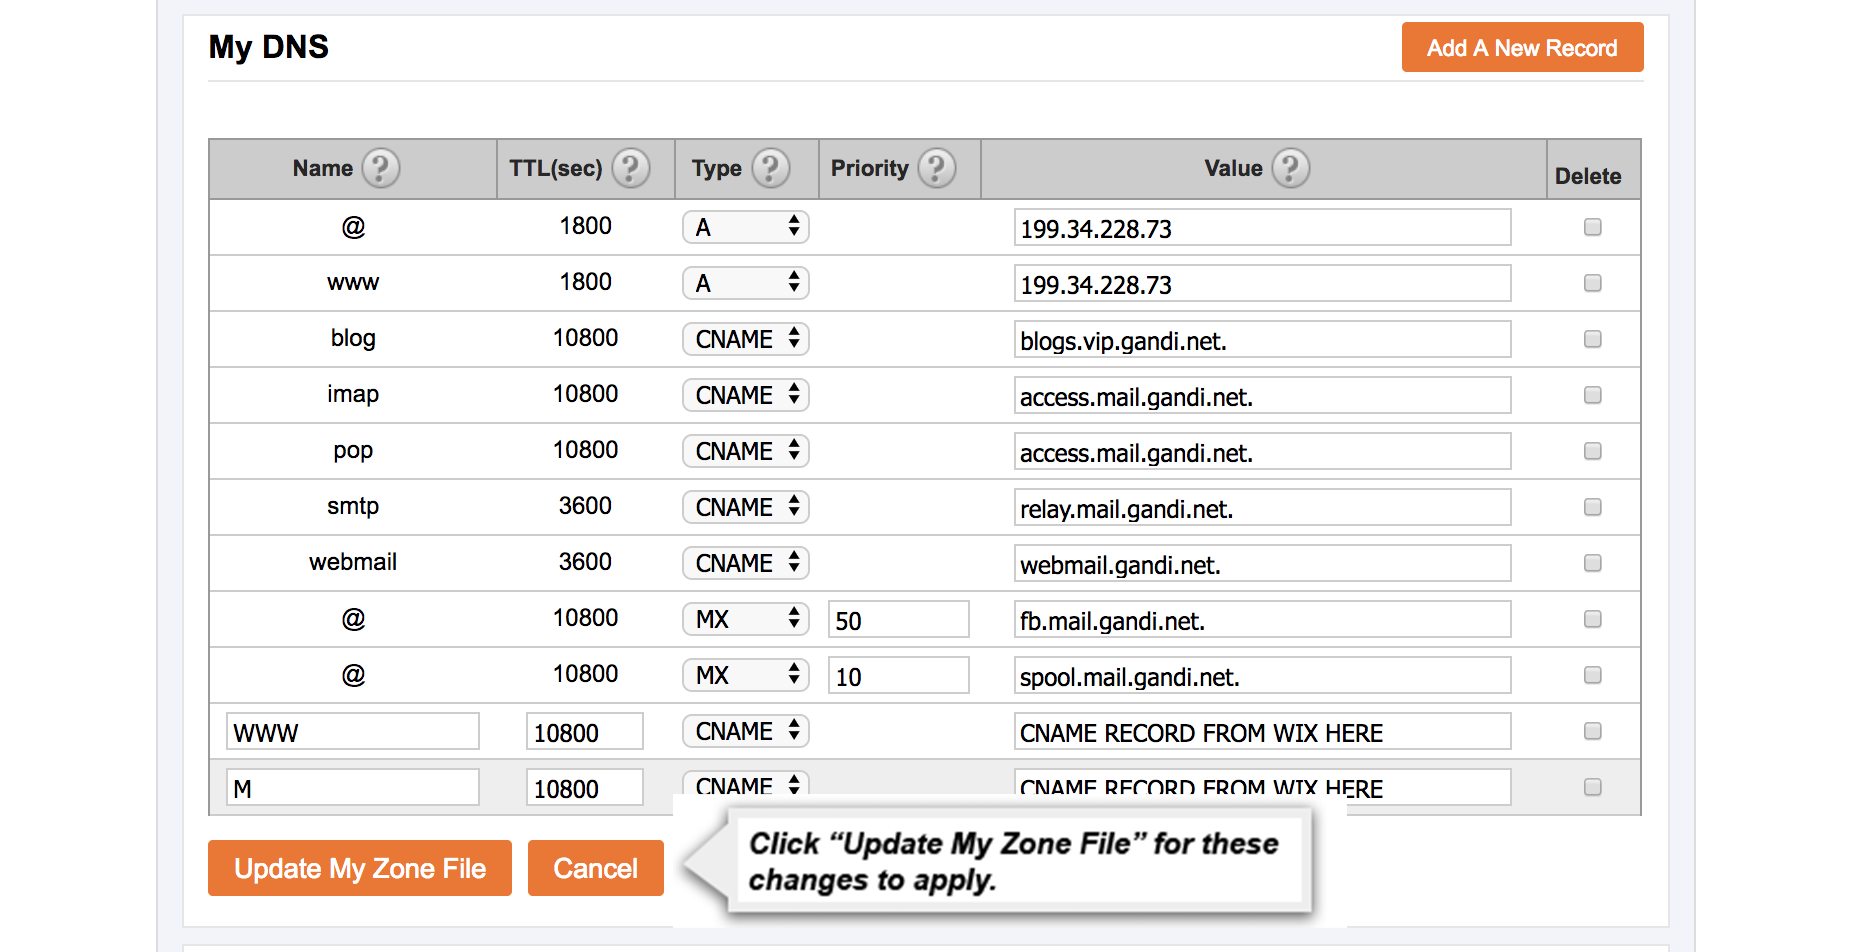
6. Copy your Wix A Record and replace the 199.34.228.59 value of the A Record at the top of your DNS Settings.
Opens a new windowArrow Showing Where to Add IP Address on A Record


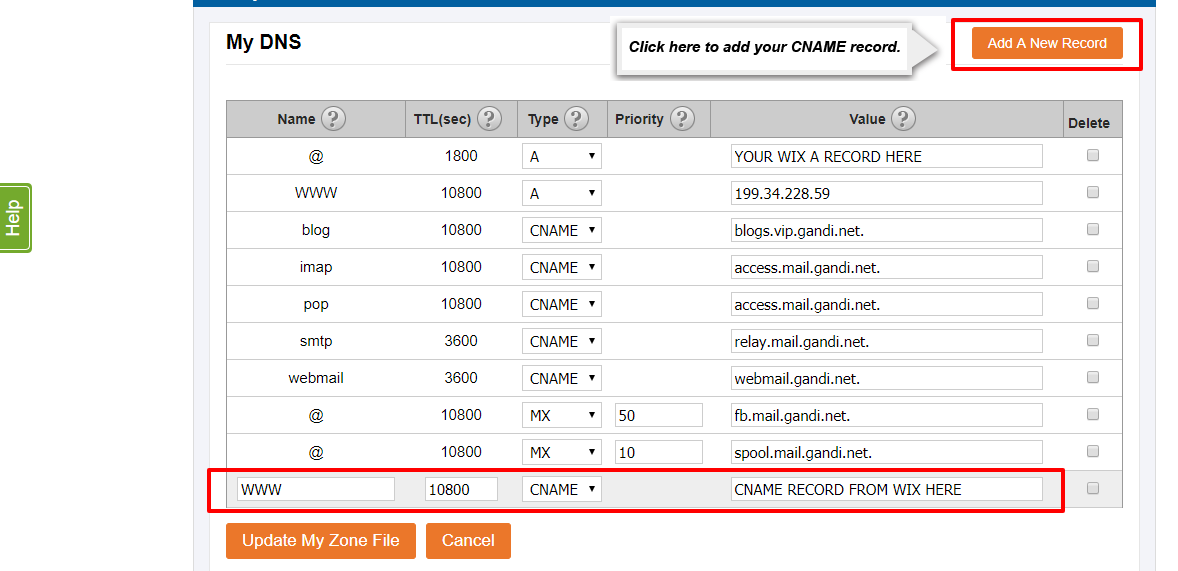
7. Click “Add A New Record”, then copy the CNAME Record from Wix and paste it into the value input on the new Record row. Make sure the name of this new record is www, the TTL is set to 10800, and the Type is set to CNAME.

Opens a new windowArrow Pointing to Add A New Record Button to add CNAME Record


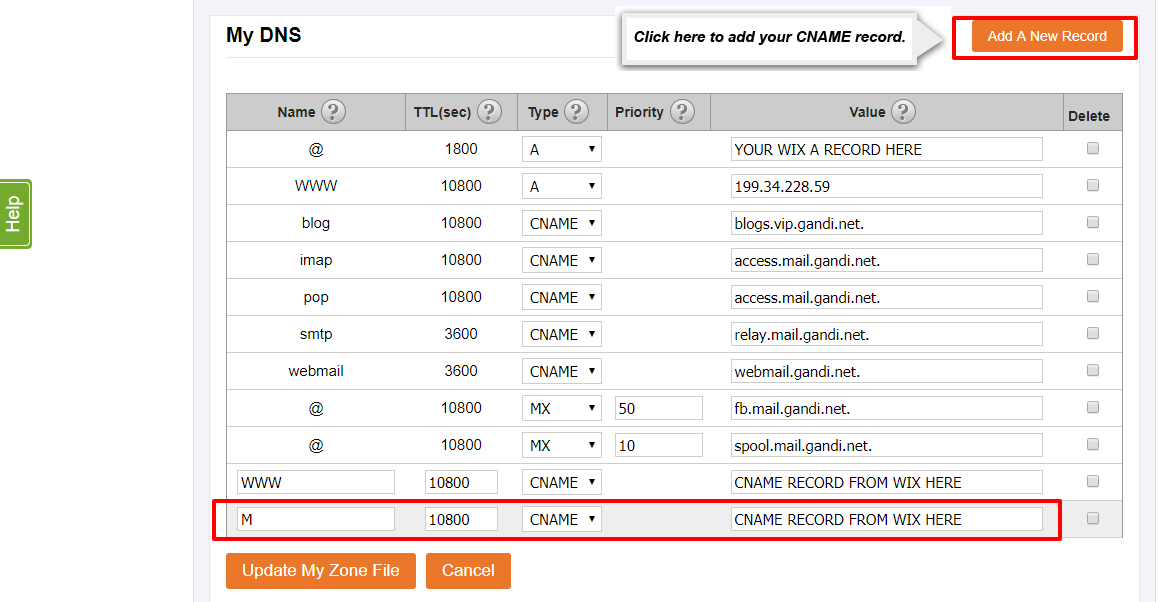
8. Click “Add A New Record”, then copy the CNAME Record from Wix and paste it into the value input on the new Record row. Make sure the name of this new record is M, the TTL is set to 10800, and the Type is set to CNAME.
Opens a new windowArrow Pointing to Add A New Record Button to add CNAME Record


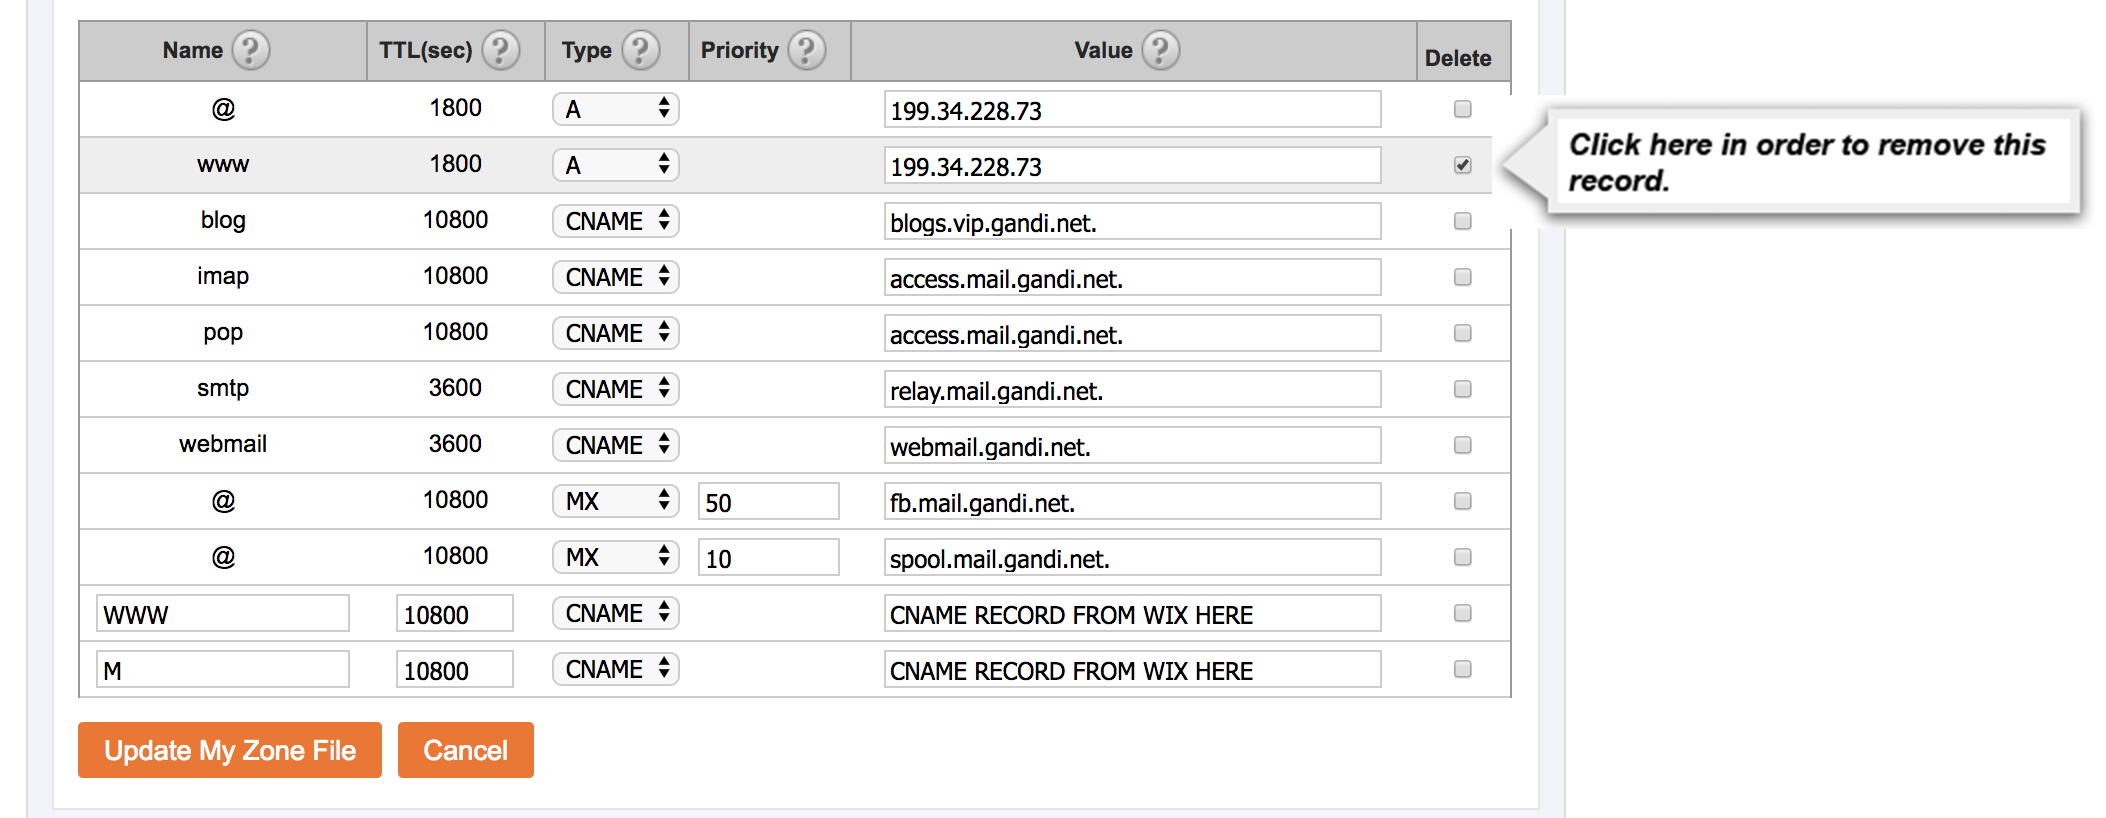
9. Click on the Delete checkbox next to the A Record still set to 199.34.228.59
Opens a new windowArrow Pointing to Delete Checkbox to delete a DNS record


10. Click “Update My Zone File".
Opens a new windowArrow Pointing to Update My Zone File button to update DNS


If you have any trouble connecting your domain to Wix please contact customer service by using the "Submit A Request" in the top right corner.